First time here? Put the app on your phone
The app runs from your private link, but it works best saved to your home screen: it opens full screen like a normal app, keeps working with no signal, and remembers your login. Takes a minute. Do this once, on the phone you use on site.
iPhone (Safari)
- Open your private link in Safari. If it opened inside another app (Messages, Gmail, Facebook), tap and hold the link, copy it, and paste it into Safari's address bar.
- Tap the Share button at the bottom of the screen (the square with an arrow pointing up).
- Scroll down the list and tap Add to Home Screen.
- Tap Add (top right). The app icon appears on your home screen.
- From now on, open the app from that icon, not from the text message. The first time you take a photo, tap Allow when it asks for the camera.
Android (Chrome)
- Open your private link in Chrome. If it opened inside another app, tap the ⋮ or "open in browser" option, or copy the link into Chrome.
- Tap the ⋮ menu in the top right corner.
- Tap Add to Home screen — on some phones it says Install app. Chrome may also show an Install bar at the bottom of the page; that works too.
- Tap Install or Add. The app icon appears on your home screen (on some phones, in the app drawer first — drag it to the home screen).
- From now on, open the app from that icon. The first time you take a photo, tap Allow when it asks for the camera.
Already have the icon but it shows the Access key screen? Open your private link once more from the message, then go back to the icon. Icon missing after a new phone? Ask the office for your link and repeat the steps above.
On this page
- First time: put the app on your phone
- Opening the app and your private link
- The Jobs screen
- Stage 1 — Pre-visit
- Stage 2 — Proof of work
- Photos that sell the work (before and after)
- Stage 3 — Certificate
- Stage 4 — Post-job and Finish
- On-site assessment (quotes)
- When something goes wrong
- Quick reference
The rule: a visit is not finished until the certificate is sent and the app says Finished. A certificate sent from home is a late certificate.
1 Opening the app and your private link
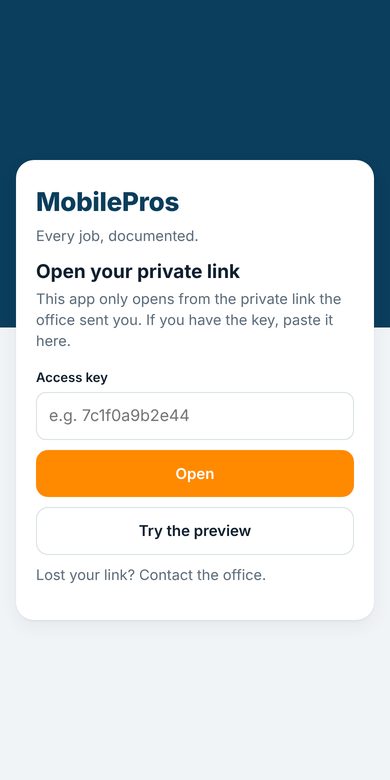
PurposeYour private link is your login. There is no username or password to remember, and nobody can open the app without a link the office gave them.
- The office texts or emails you a link that ends in
?k=and a code. Tap it once. The app remembers you on that phone from then on. - Save it to your home screen the first time — the steps for iPhone and Android are at the top of this page.
- If you ever see the Access key screen, paste the code from your link and tap Open.
- Lost your link, or got a new phone? Ask the office. They can send a new link in one click; the old one stops working.
Never share your link. Everything you send is recorded under your name. If a link leaks, tell the office so they can replace it.
2 The Jobs screen
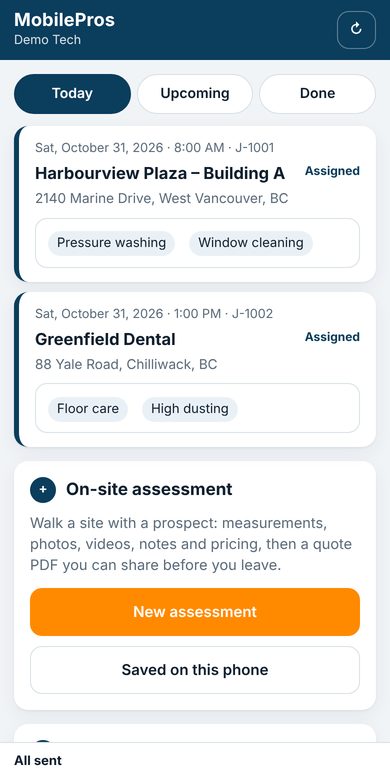
PurposeYour schedule. The office assigns jobs; they appear here with the site, address and services, so you never leave for a job without knowing what it is.
- Today shows what is due today (and anything overdue). Upcoming is later this week. Done is what you finished.
- Each card shows the time, the site, the address and the services on the job. A card with an orange edge is in progress; green is finished.
- Tap a job to open it. If you had already started it, it opens where you left off.
- Tap ↻ at the top to check for new jobs. New assignments usually appear by themselves.
- On this phone lists your recent visits and assessments and whether everything has been sent. "3 waiting" means the phone is holding items until it has signal.
No signal? The app keeps working. Photos, signatures and PDFs are saved on the phone and sent the moment signal returns — just leave the app installed and the phone on.
3 Stage 1 — Pre-visit
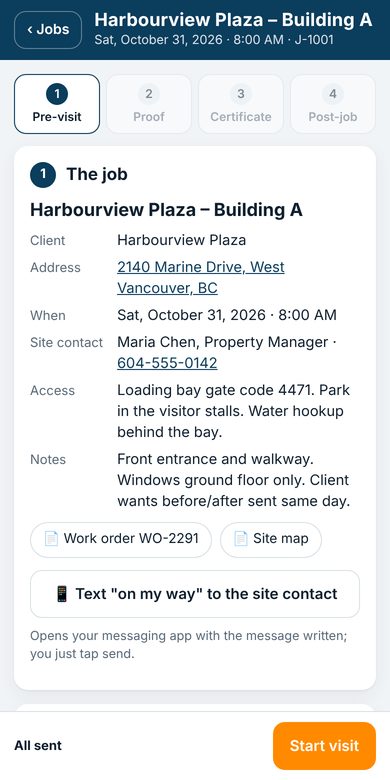
PurposeArrive ready. Everything you need is on this screen: where, who, how to get in, what is on the job. The checklist is your commitment that you have what you need before any work starts. Starting the visit tells the office you are on site and when.
- Read the job card. Tap the address to open it in Maps; tap the phone number to call the site contact. Read the access notes and the job notes; open any attached documents.
- Tap “Text ‘on my way’” before you set off. It opens your messaging app with the message already written — who is coming, when, for what — and you just tap send. The office sees that you sent it.
- Check the services. These are what is on the work order. Untick anything that is not on today's job and add anything that is (Add a service…). Every ticked service will need Before and After proof.
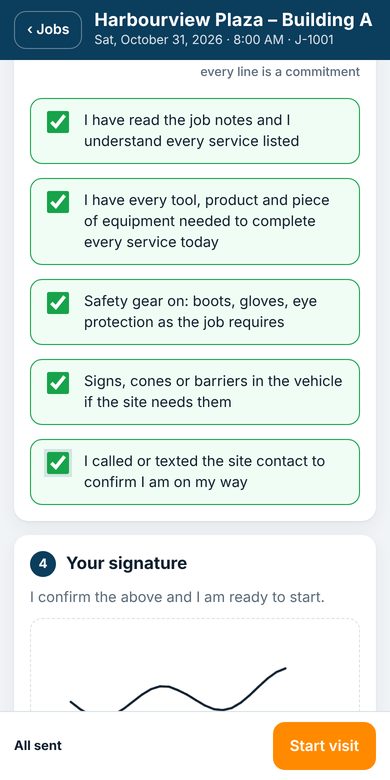
- Tick every line of "Before you start". Every line is a commitment. If something is unclear, call the office before you start, not after.
- Sign with your finger.
- Tap Start visit. The start time, your location and your signed checklist go to the office (allow location when the phone asks — it is only recorded at start and finish). The stage turns green and you move to Proof of work.
Services are locked once you start. You can still add an extra service on the next screen, but you cannot remove one — so check the list before you start.
4 Stage 2 — Proof of work
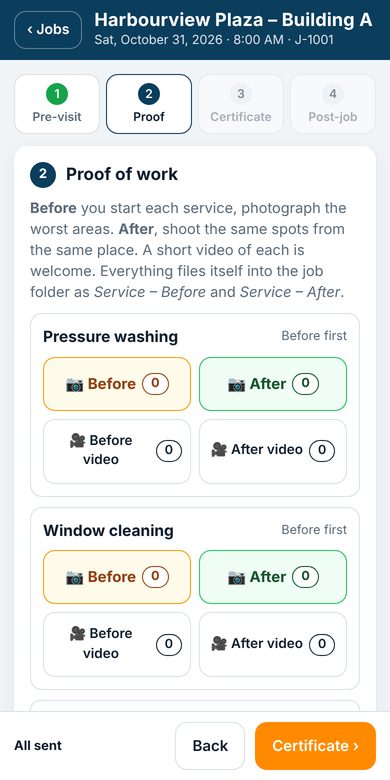
PurposeThe photos are the record of the work. Before and after, same spot, every service. They file themselves into the job's folder, named by service and stage, so the office and the client can see exactly what was done without anyone sorting a single picture.
- One card per service. Before you touch anything, tap 📷 Before and photograph the worst areas. Take up to 6 in one go; tap again for more.
- Do the work.
- Tap 📷 After and shoot the same spots from the same place. That is what makes a before/after the client can trust.
- A short walk-through video is welcome: 🎥 Before video / 🎥 After video. Keep clips under about a minute.
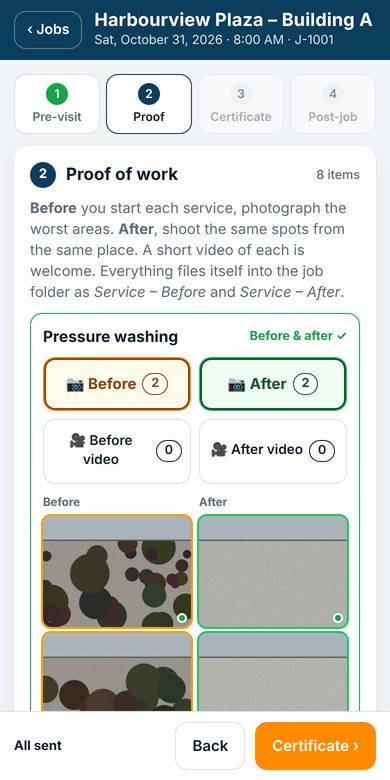
- Photos line up as pairs: first Before beside first After, second beside second. Shoot them in the same order and the pairs match on the certificate. The card turns green with Before & after ✓ when it has both. Tap a thumbnail to see it full size or remove it (only until it has been sent).
- If a photo comes out blurry the app shows it and asks Retake or Keep it anyway. Retake.
- The small dot on each thumbnail turns green when that photo has reached the office. Orange means it is waiting for signal.
- Did a service that was not on the list? Add a service that was not on the list… at the bottom, then photograph it like the others.
- When every card is green, tap Certificate ›.
What good photos look like: wide enough to recognise the place, close enough to see the dirt. Daylight or lights on. Same angle before and after. Three good photos beat ten blurry ones. The full guide is the next section.
📷 Photos that sell the work
PurposeYour before and after photos go on the certificate, into the client's folder and onto the company's public page. Ten minutes of technique makes every job look as good as it was. This is the short version; the full guide with examples is one tap away.
- Same spot, same frame, same height. Pick a landmark (a door, a drain, a stall number) and shoot the after from exactly where you shot the before.
- Light it. Early starts are dark: headlamp on, pointed at the surface from the side. Lot lights on. Never shoot into the sun or a lit window; flash off on glass and wet floors.
- Before: show the problem. Find the worst of it, get close on it, then one wide shot for where it is. Don't tidy first.
- After: prove it. Same spot, surface dry, hoses and cones out of the frame, no people.
- The money shot: stop halfway and take one photo with the dirty half and the clean half in the same frame.
- Never: faces, licence plates, unit numbers, paperwork, screens, your own reflection. Photos only count through the app.
5 Stage 3 — Certificate
PurposeThe certificate is the signed proof that the work was done, where, and that the client saw it. It becomes a one-page PDF with your before/after photos on it, goes into the job folder and is emailed to the office the moment you send it. It is also where the client rates the visit.
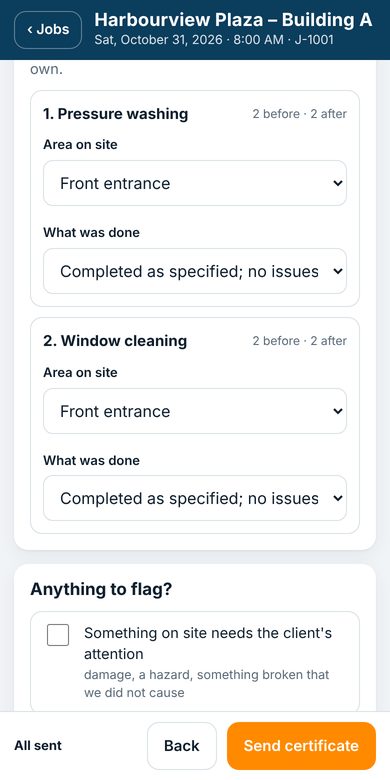
- One line per service. Pick the Area on site and What was done — use the standard note unless something different happened, then Write my own.
- Anything to flag? Tick Something on site needs the client's attention for damage or hazards you found but did not cause, and say what. Tick Job NOT completed if you could not finish, with the reason — the office books the return visit from this.
- Sign the Technician box.
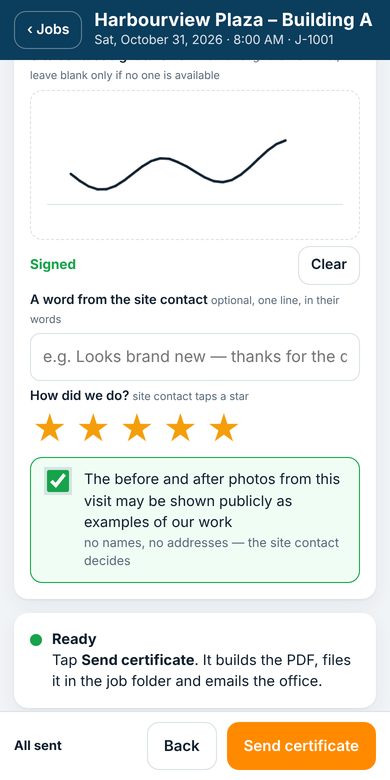
- Walk the site contact through the work, then hand them the phone: they type their name and role and sign in the Site contact box, tap a star rating, and decide whether the photos may be used publicly as examples of our work. If they say something good, type it in A word from the site contact — one line, their words. Leave the signature blank only if nobody is available.
- Tap Send certificate. Wait for the green Certificate sent line. If there is no signal it sends by itself later — carry on.
Never list a service twice, and never send a blank certificate. Could not do the visit at all? Still send one: no services, NOT completed, the reason — so the office gets the alert.
6 Stage 4 — Post-job and Finish
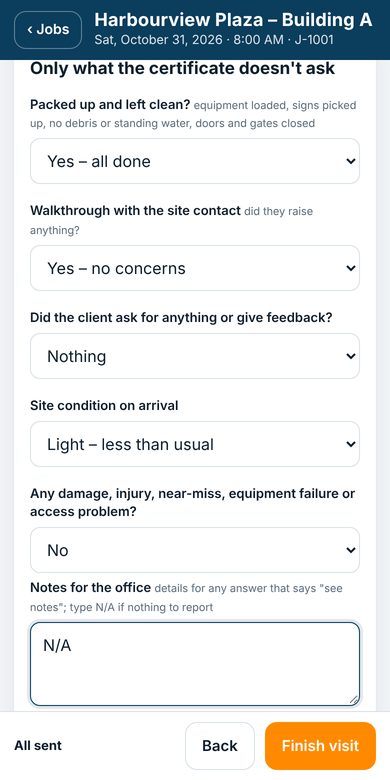
PurposeThe things the certificate does not ask: did you leave the site clean, did the client say anything, did anything go wrong. The office can only act on what you tell them here. Finishing stamps the end time and closes the job.
- Answer every question. Any answer that says "see notes" needs a line in Notes for the office — what the client asked for, what the concern was, what broke. Nothing to report? Type N/A.
- Damage, an injury or a near-miss: pick Yes and call the office before you leave.
- Sign, then tap Finish visit.
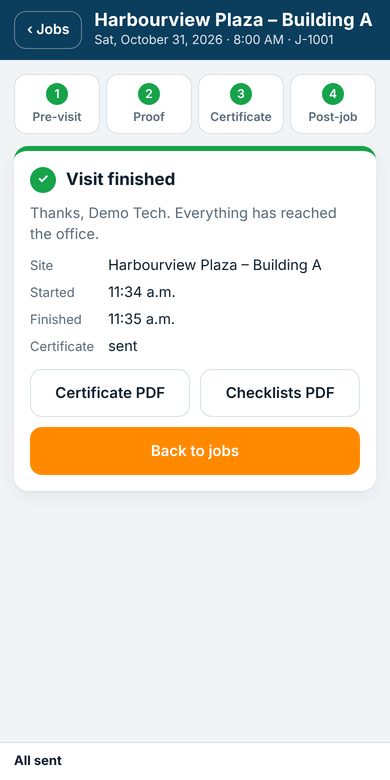
- The Visit finished screen shows the start and finish times. If it says items are still sending, keep the phone on until the bar reads All sent. You can save the certificate or checklist PDFs from here.
- Back to jobs. The job moves to Done.
Do not leave the site until every stage is green. Pack up, walk the site, then finish — on site.
7 On-site assessment (quotes)
PurposeWalking a site with a prospect. Measure it, photograph it, price it, and hand them a quote PDF before you leave. Everything lands in the Assessments folder with the photos, so the office can turn it into a job without a second visit.
- On the Jobs screen tap New assessment. Fill in the prospect: business, site, address, contact, phone or email. Your name and today's date are already in.
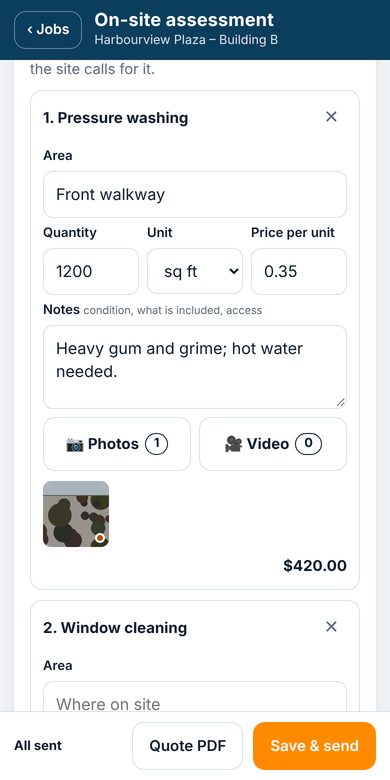
- Walk-around — one line per service and area. Add a service…, type the area, enter the quantity (sq ft, linear ft, each, hours). The unit and price come from the company price list; change the price on the spot if the site calls for it. The line total updates as you type. By quote items take a single quoted price.
- On each line, 📷 Photos / 🎥 Video of that specific area, and a note on condition or what is included.
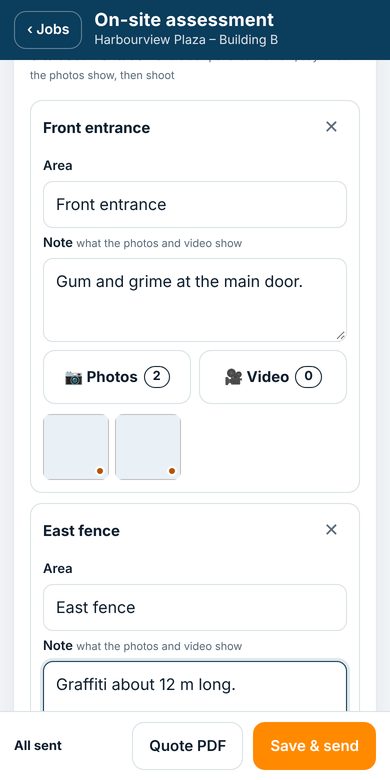
- Site notes & documentation: access, parking, water and power; hazards to flag. Then one block per area you want on record — name the area, note what the photos show, shoot. + Add an area for the next one.
- Pricing: check the subtotal, add a discount if agreed, pick the frequency, add any notes on the quote. The prospect can sign to confirm they reviewed it with you (optional).
- Quote PDF to show or share it on the spot. Save & send files the PDF and all photos and emails the office. You can edit and save again later; the quote is replaced.
Measure, don't guess. If you cannot measure it, set the unit to by quote and say why in the note. A wrong number on a quote costs more than a missing one.
? When something goes wrong
- No signal on site
- Keep going. Everything saves on the phone and sends when signal returns — "waiting" in the bottom bar is normal. Do not uninstall the app or clear the browser while items are waiting.
- I took a wrong or blurry photo
- Tap the thumbnail → Remove. If it has already been sent (green dot), leave it and take a better one; the office keeps the good one.
- The video will not save
- Clips are limited to about a minute (40 MB). Shoot a shorter one, or two short ones.
- I cannot tap "Start visit" / "Send certificate" / "Finish visit"
- The line above the button says what is still needed — an unticked line, a missing area, a signature.
- The site contact will not sign or is not there
- Leave their box blank and send the certificate anyway; the app asks you to confirm. Say so in the post-job walkthrough answer.
- I need to add a service after starting
- On the Proof of work screen: Add a service that was not on the list…. It is added to the certificate too.
- I opened the wrong job
- Tap ‹ Jobs and open the right one. Nothing is sent until you tap Start visit.
- The app looks out of date or something is broken
- Close it fully and reopen it; it updates itself. If it still fails, open your private link in the browser again.
- Lost my link / new phone
- Ask the office for a new link. Visits already sent are safe; a visit in progress on the old phone stays on that phone.
Questions: the office.
✓ Quick reference — every visit
1 · Pre-visitRead the job. Check services. Tick every line. Sign. Start visit.
2 · ProofBefore photos → do the work → After photos, same spots. Every service green.
3 · CertificateArea + note per service. Flag issues. You sign, site contact signs and rates. Send.
4 · Post-jobAnswer every question, notes for any "see notes". Sign. Finish — on site.
Then leave. Not before.